A tenant is waiting in the driveway, a replacement clicker is still in its packaging, and the LiftMaster opener refuses to respond. In most cases, the problem isn't a failed motor or logic board. The remote missed the opener's short pairing window, or the replacement device doesn't match the opener's security generation.
To reprogram a LiftMaster garage door, the installer or property manager needs three things ready before starting: the opener's Learn-button color, a compatible remote or keypad, and a clear view of the opener's confirmation signal. The sequence is straightforward, but small mistakes, especially holding the Learn button too long, can erase every stored credential instead of adding one.
Table of Contents
- When a LiftMaster Remote Stops Working
- Before You Press Anything
- Reprogramming a Remote on a LiftMaster Opener
- Reprogramming a LiftMaster Wireless Keypad
- Why Reprogramming Fails and How to Fix It
- Moving Beyond Clickers With Smartphone Access
- When to Call a Pro and What Comes Next
When a LiftMaster Remote Stops Working
A resident often starts by pressing the remote repeatedly, changing the battery, or standing directly beneath the motor unit. That reaction is understandable, but it doesn't address the most common failure. Modern LiftMaster systems use a rolling-code process, so the remote and opener must recognize the same security protocol before access is accepted.
LiftMaster introduced rolling-code security under the Security+ brand in 1996, with more than 100 billion possible combinations, as described in this historical overview of LiftMaster's rolling-code development. The system changes the code after each transmission, which makes an old captured signal far less useful, but it also means a device can stop working when it loses synchronization or was never paired correctly.
Three service situations appear repeatedly:
- A lost or stolen clicker: The property owner needs to remove the missing device before issuing a replacement.
- A replacement remote: The new remote may be compatible, but it won't operate the door until the opener learns its signal.
- A keypad turnover: An HOA, landlord, or facility manager needs to replace an old PIN after a resident or tenant leaves.
The practical fix is often a brief Learn-button press followed by immediate device pairing. On many units, the opener keeps the Learn LED illuminated for about 30 seconds, creating a narrow window for the remote, keypad, or in-car transmitter to respond, according to this LiftMaster programming instruction sheet.
Practical rule: Stage the device first. Press Learn only when the remote or keypad is already within reach.
Once the opener's generation is identified, the pairing itself usually takes only a few minutes. Anyone still dealing with broader power, travel, or door-operation symptoms should review common garage door opener issues before treating every failure as a programming problem.
Before You Press Anything
A failed pairing attempt often starts before the Learn button is touched. Confirm the opener model, button color, power, and accessory condition first. That short inspection prevents the common mistake of blaming a compatible remote for a dead opener or weak signal.
Confirm the opener and accessory family
Read the label on the motor housing and locate the Learn button. It may sit on the back or side of the unit, near the antenna wire, behind the light cover, or under a small access panel. Newer LiftMaster and related Chamberlain Group openers generally use this programming layout, while substantially older units may use another control method.
The Learn-button color is a practical compatibility check. Green-button units belong to the 1993 to 1997 Billion Code generation. Red, orange, purple, and yellow buttons identify later security families, as described in the LiftMaster instruction documentation.
| Button Color | Opener Era | Frequency | Compatible Remote Line |
|---|---|---|---|
| Green | 1993 to 1997 | Billion Code | Matching older Billion Code remotes |
| Red or orange | Later Security+ generation | Security+ family | Matching red or orange Security+ remotes |
| Purple | Security+ generation | Security+ family | Matching purple Security+ remotes |
| Yellow | Security+ 2.0 generation | Security+ 2.0 | Matching yellow-button Security+ 2.0 remotes |
The color identifies the opener's communication family. A remote can be brand-new and still be the wrong match.
Check power and signal path
Before entering programming mode, check these points:
- Motor-unit power: The opener should respond to its wall control, and the Learn indicator should illuminate when activated.
- Antenna position: The wire should hang freely from the motor housing, not remain coiled or pressed against the case.
- Remote or keypad battery: A remote may flash its own LED while transmitting too weakly for reliable pairing.
- Device location: Keep the remote or keypad within arm's reach of the motor head before pressing Learn.
If the wall control is also unresponsive, solve the power or opener fault first. Programming will not correct a disconnected unit.
Keep hands clear of the door, trolley, springs, cables, and other moving hardware during testing. Use a stable ladder when the Learn button is overhead. Clear people, pets, and vehicles from the door area before testing the programmed device.
Reprogramming a Remote on a LiftMaster Opener
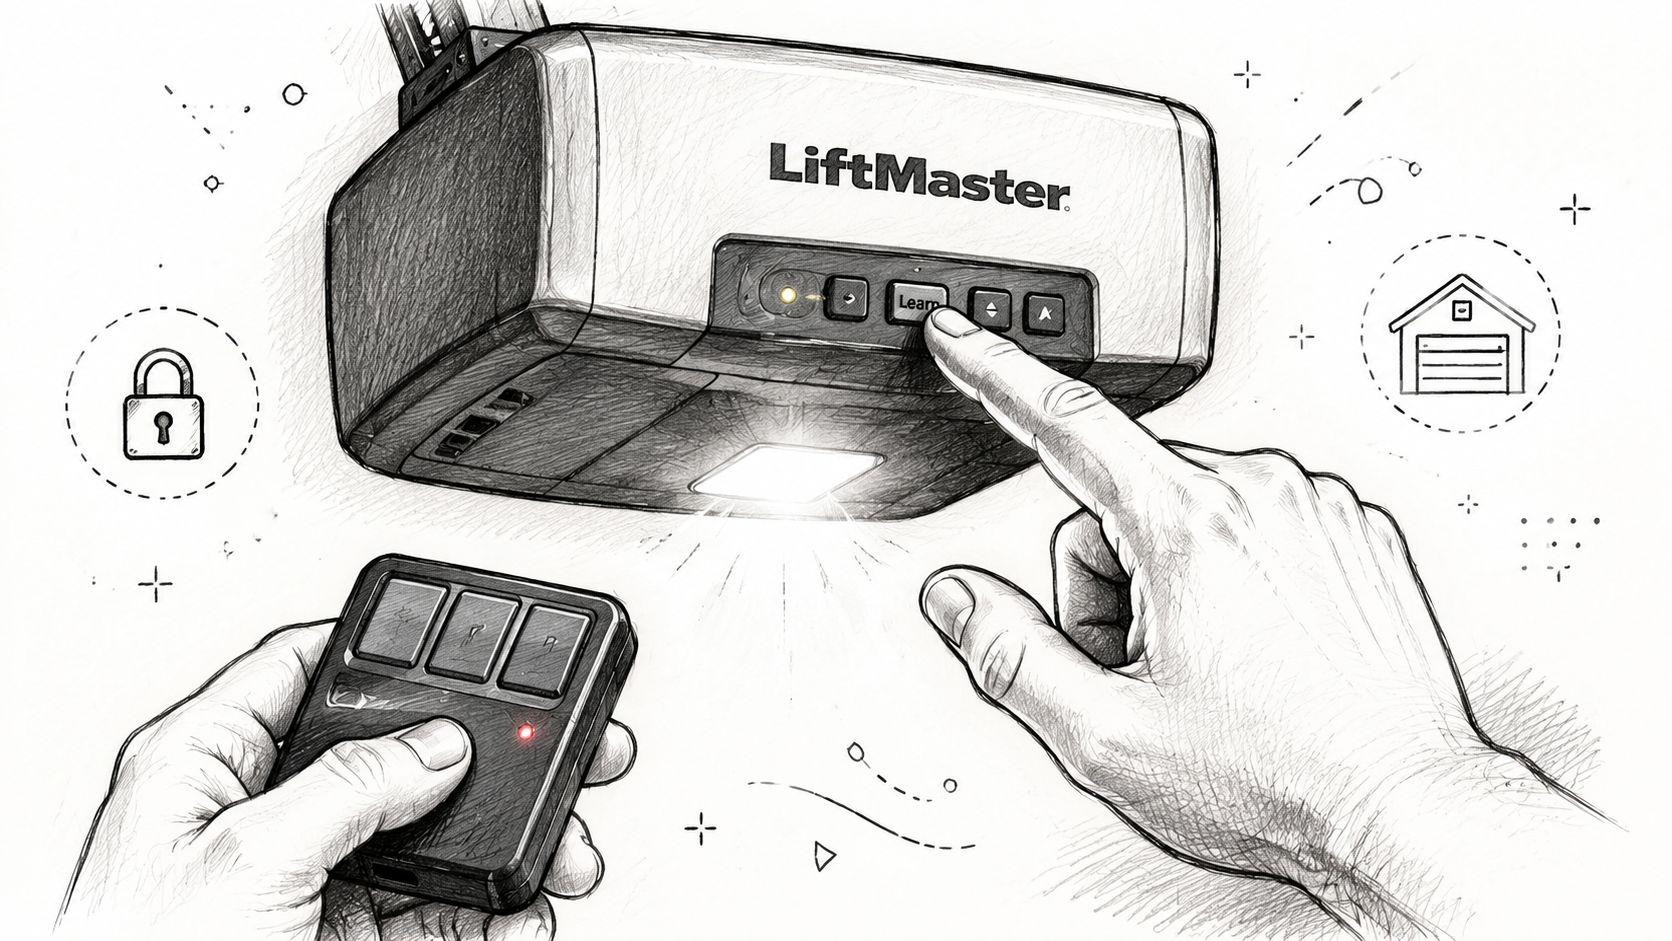
The standard remote sequence has one critical distinction: press and release starts pairing, while a prolonged Learn-button hold clears the memory. Confusing those actions is the fastest way to turn a simple remote addition into a full reprogramming job.
Pair one handheld remote
- Locate the Learn button. Remove the light lens or access cover if the button isn't visible.
- Press and immediately release Learn. The nearby indicator should illuminate, opening a programming window of about 30 seconds, according to LiftMaster programming guidance.
- Press the desired remote button. Hold the button while standing close to the motor unit. The exact response varies by opener generation.
- Watch for confirmation. The opener light may blink, the Learn indicator may flash or change state, or the motor unit may produce an audible click.
- Test the remote. Press the programmed button again from a safe position where the entire door is visible.
The confirmation matters because a remote's own LED doesn't prove that the opener accepted the signal. The opener's light, indicator, or click is the useful verification.
Add more devices without clearing the first
Repeat the brief Learn-button sequence for each additional remote, keypad, or vehicle transmitter. A property manager should label devices by unit, door, or resident while pairing them, because an unlabeled collection of clickers quickly becomes difficult to audit.
Some Security+ 2.0 accessories use a different button sequence from earlier Security+ remotes. The opener's Learn color and the accessory's model instructions must agree, particularly when a purple-button remote is being considered for a yellow-button opener.
Erase every stored credential
A lost remote requires a different action:
- Press and hold the Learn button for about 6 seconds.
- Continue until the indicator light goes out.
- Release the button.
- Reprogram only the authorized remotes and keypads.
This procedure clears stored remote and keyless-entry codes on many LiftMaster units, as shown in this LiftMaster memory-erasure demonstration. It also removes working devices that still belong to residents or staff, so the administrator should inventory approved devices before wiping the opener.
Don't coil or tuck the antenna wire into the motor housing after programming. A remote that pairs successfully but works only nearby often has a signal-path problem rather than a pairing problem.
Reprogramming a LiftMaster Wireless Keypad
Keypad programming is less forgiving because it combines opener Learn mode with keypad setup. The device must first be placed into its programming state, then the chosen PIN must be sent to the opener before the window closes.
Prepare the keypad
The factory-default PIN and setup sequence depend on the keypad model. The default information may appear on the inside of the cover or on the quick-start card, and some older instructions reference default values such as 1234 or 4678. Those values shouldn't become the permanent access code.
Clear or activate the keypad according to its model instructions. MAX-family devices, including some 877MAX and 890MAX units, may require an ID-set step that older 377LM keypads don't use.
Pair the PIN with the opener
Use this sequence for the common Learn-button workflow:
- Open Learn mode: Press and release the Learn button on the motor head. The indicator should glow for about 30 seconds, as described in this LiftMaster keypad programming walkthrough.
- Activate the keypad: Enter the selected four-digit PIN while the opener remains in Learn mode.
- Send and confirm: Hold ENTER until the opener light blinks or a relay click confirms acceptance.
- Test the PIN: Close the keypad cover, enter the PIN, and verify that the door responds from a safe position.
- Repeat the test after power is restored: This helps separate a keypad setup error from a power or receiver issue.
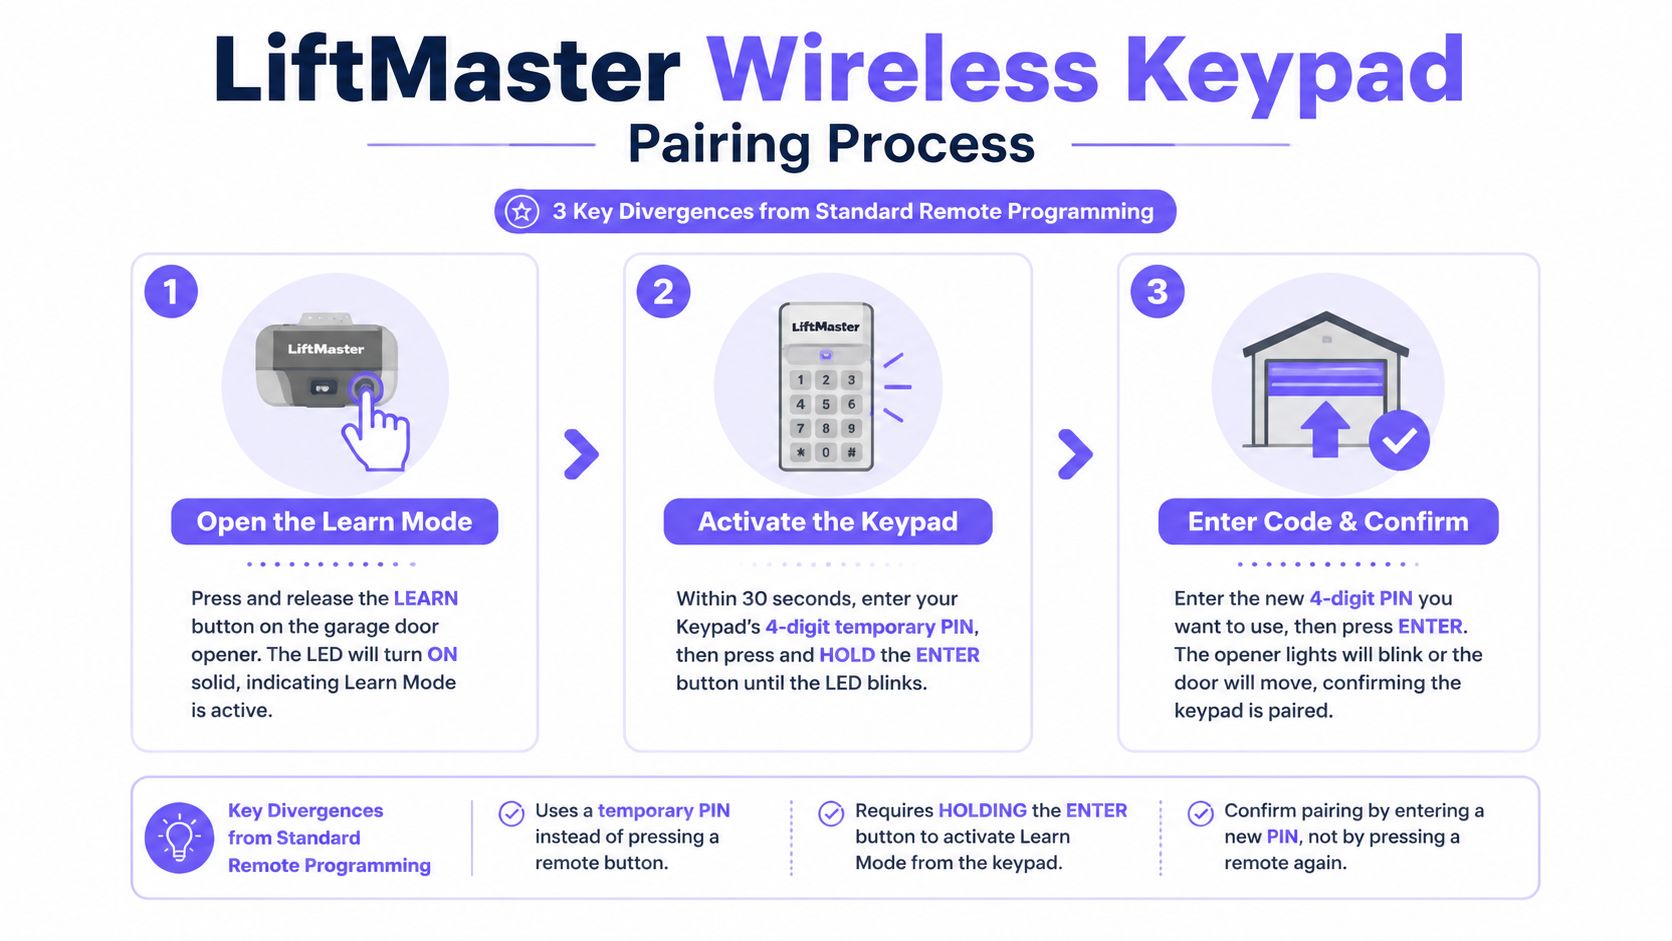
Security+ 2.0 systems require the keypad and opener to use the same rolling-code family. A keypad can accept keystrokes normally and still fail to operate the door if its programmed identity doesn't match the opener.
A keypad that lights up is not necessarily a keypad that has paired. The opener must provide the confirmation signal.
For communities and rental properties, avoid leaving a shared, easily guessed PIN in circulation. When a resident moves out, the better practice is to replace the code or clear the stored keypad and create a new credential, rather than relying on a former tenant's cooperation.
Residents who need stronger entry verification can also secure garage access with video, especially where a keypad is serving more people than a single household.
Why Reprogramming Fails and How to Fix It
Following the button sequence does not guarantee access. At the property, start with the symptom, then check power, compatibility, receiver function, wiring, and stored memory in that order.
| Symptom | Most Likely Cause |
|---|---|
| No click or indicator response after Learn is pressed | Motor-unit power issue, tripped wall control, or control lockout |
| Learn indicator activates but the remote won't pair | Incompatible security generation or weak remote battery |
| Keypad accepts the PIN but the door doesn't move | Terminal wiring problem or keypad lockout |
| Remote works only close to the opener | Antenna placement, battery, or receiver-range problem |
| A previous owner's remote still works | Stored code was never erased |
No click, blink, or Learn response
Begin at the motor head. Confirm the outlet and opener power connection, then check whether the wall control is locked. If the wall button also fails, the remote is unlikely to be the primary problem.
Check the red emergency-release cord as well. The trolley must remain mechanically engaged for normal powered operation. If the carriage is disengaged, the motor can run without moving the door, creating the appearance of a programming fault even when the receiver accepted the command.
Learn mode works, but pairing fails
A flashing Learn indicator confirms programming mode. It does not confirm that the accessory belongs to the opener's security family.
Match the remote with the Learn-button color, install a fresh battery, and repeat the attempt. A remote's own status light can work even when its signal is too weak for reliable programming. If several compatible remotes fail, suspect the receiver rather than replacing every remote.
The keypad accepts a PIN but the door stays still
Inspect the keypad battery and the opener's control wiring. A loose or stripped terminal wire can leave the keypad responsive while the operator receives no usable command.
Repeated incorrect entries can also place some keypads in a temporary lockout. Wait 60 seconds before entering the PIN again, as described in this LiftMaster programming reference.
Range is poor after successful pairing
Test beside the opener, then move toward the driveway. If the remote works nearby but fails at normal distance, inspect the antenna wire behind the motor unit. It should hang straight outside the housing. A loop around the opener can reduce range, as can a weak battery or receiver interference.
An old remote still operates the door
The previous credential is still stored in memory. Hold Learn for about 6 seconds and wait for the indicator to go out. Then pair each approved device again.
Use this reset after a lost clicker, tenant turnover, or an unknown previous occupant. Reprogramming only the new remote leaves the older credential active, which is often the security problem the owner was trying to solve.
Moving Beyond Clickers With Smartphone Access
A handheld remote and exterior keypad can be perfectly adequate for a single residence. They become harder to manage when a rental property, HOA, small office, or warehouse accumulates devices that belong to former residents, contractors, delivery staff, and temporary users.
The programming process remains technically short, but the administrative burden grows. Someone still needs physical access to the motor head, the former user may need to return a clicker, and the property manager needs a reliable record of which credential currently works.
Where a retrofit changes the operating model
A cellular smartphone retrofit replaces shared physical credentials with individually assigned digital access. A property manager can revoke a former tenant's permission without collecting a clicker, issue a visitor credential remotely, and review entry activity through the access platform.
The useful distinction is between device pairing and credential administration:
- Clickers and PINs: Simple for a small group, but difficult to attribute when shared.
- Cloud-based access control: Better suited to revocable permissions, scheduled access, and remote visitor management.
- Cellular connectivity: Avoids dependence on local Wi-Fi availability and reduces the operational impact of household or site-network interruptions.
- Hardware-agnostic retrofits: Can connect to existing gate operators and access hardware without requiring a complete replacement.
The existing LiftMaster remote or keypad can remain available as a backup while smartphone access handles routine entry. This approach is especially sensible when the same property repeatedly needs reprogramming because of turnover, lost credentials, or audit requests.
A cellular gate entry app is therefore not merely a replacement clicker. It represents a shift from one opener remembering a collection of devices to a managed access system that can control permissions centrally.
When to Call a Pro and What Comes Next
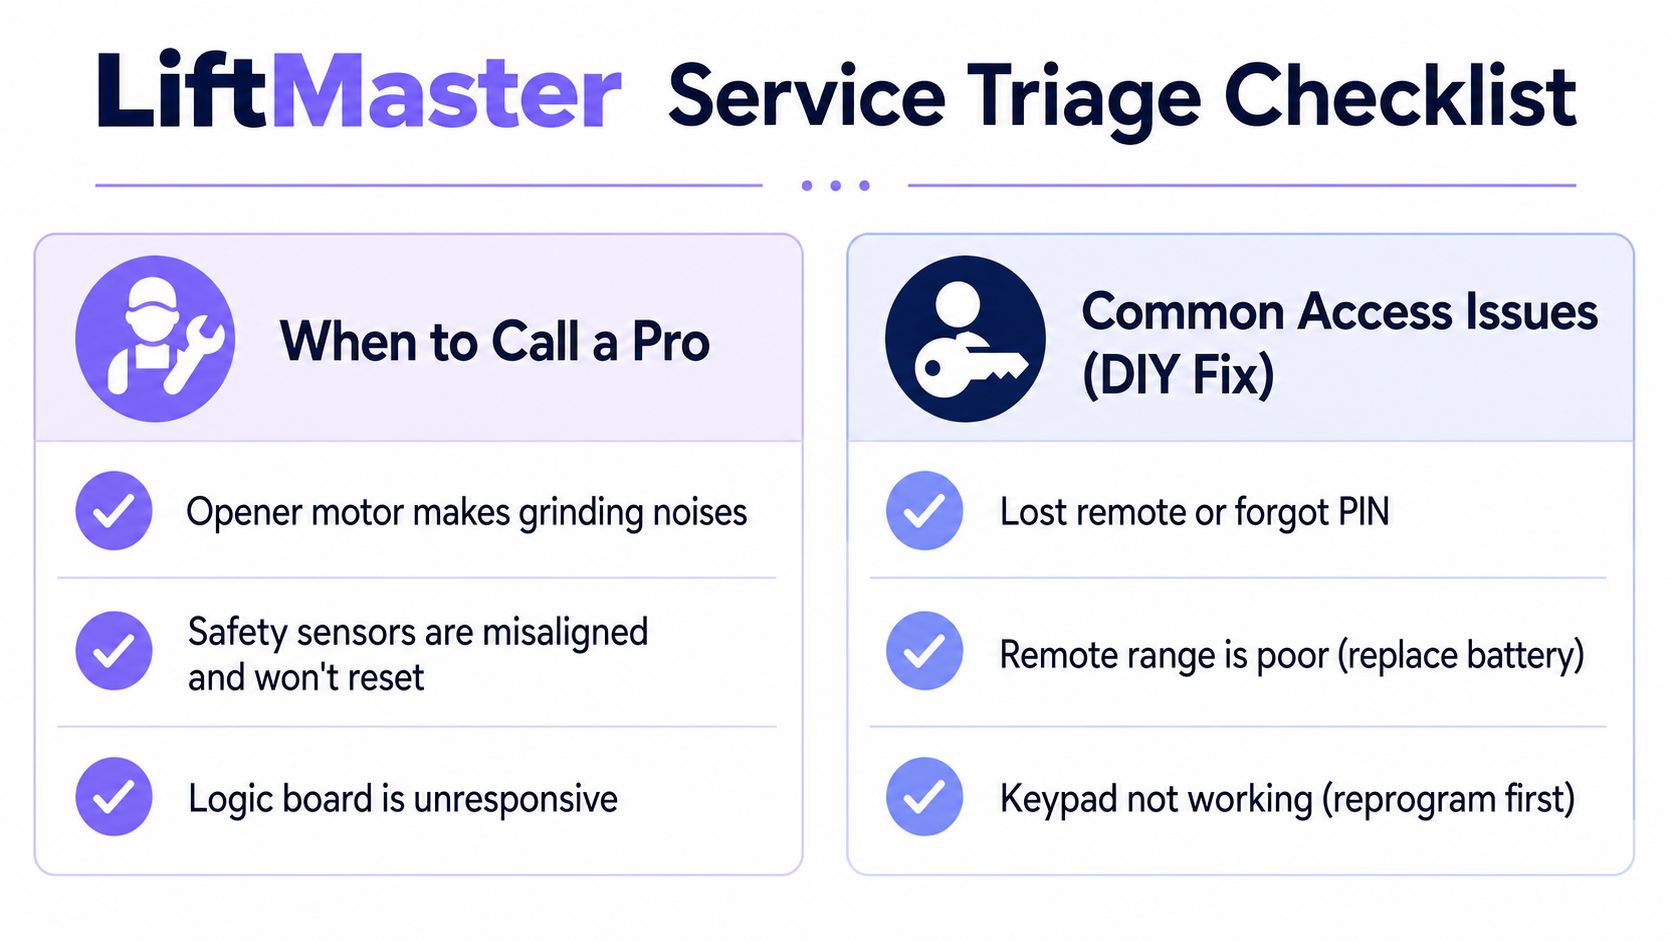
Programming is a reasonable DIY task when the opener responds normally, the Learn indicator works, and the accessory matches the security generation. Repeatedly pairing a remote won't repair a mechanical or electrical fault.
Call a technician when the hardware is suspect
A LiftMaster-authorized technician should inspect the system when:
- The wall control is unresponsive: The problem may involve power, wiring, the receiver, or the logic board.
- The motor hums without moving the carriage: The trolley, drive system, or door mechanics may need service.
- The Learn button produces no indicator response: A failed control board or power supply is more likely than a bad remote.
- The rail, cables, or trolley show visible damage: Don't adjust springs or cables without proper training.
- The door binds, reverses unexpectedly, or moves unevenly: Programming won't correct travel, balance, or safety-system faults.
Owners should locate the serial plate and confirm warranty status before booking service. The supplied service guidance identifies openers under 5 years old as typically covered, but the exact terms depend on the model and warranty documentation.
Recognize an access-management problem
If the opener operates correctly but the property keeps losing track of remotes, PINs, and former users, the issue isn't the motor. It is a credential-management problem.
Property managers should take three actions:
- Book authorized service when power, logic, trolley, travel, or door hardware is involved.
- Evaluate a compatible smart retrofit when turnover, lost clickers, visitor access, or audit requirements drive repeated reprogramming.
- Document every paired device with its assigned unit, resident, staff member, or purpose so future changes begin with a clean baseline.
For property managers, HOA boards, and facility operators, Nimbio provides a cellular retrofit that connects smartphone-controlled access to existing electronic gates and building-entry hardware, without relying on Wi-Fi or replacing healthy equipment. Visit Nimbio to evaluate remote visitor management, revocable access credentials, and a practical path beyond unmanaged clickers and shared PINs.