A gate that stops short, reverses halfway, or won't latch cleanly usually makes people reach for the adjustment screws first. That's the wrong starting point more often than not. The safer way to handle how to adjust automatic gate opener settings is to treat the job as a safety validation process, then separate mechanical drag from control-board settings before any dial gets touched.
That matters because automatic gate operators are part of a regulated safety system. UL 325 is the key U.S. safety standard for automatic gate operators, and it requires an inherent entrapment-sensing system plus at least one independent secondary means of protection, such as photoelectric sensors or a safety edge, while installation guidance for automated vehicular gates also cites ASTM F2200 for the gate itself UL 325 guidance, automated gate construction guidance. In plain terms, every limit setting, force setting, and sensor alignment is part of a chain that decides where the gate stops and what it does when something gets in the way.
That's why a gate that seems “out of adjustment” can be binding on a hinge, dragging in a track, or sitting out of plumb. Manuals repeatedly tell installers to verify free movement, then set limits and test force and reversal again after every change manufacturer setup guidance, installation and calibration sequence. Whether the operator serves a single driveway, a multifamily entry, or a commercial access point, the risk profile is the same, because the safety logic doesn't care who owns the property.
Practical rule: if the gate won't move freely by hand, don't “tune” it harder. Fix the mechanical problem first, then adjust the operator.
This guide keeps that order straight. It separates drag from electronics, shows where limit travel belongs, explains force tuning as a final safety check, and names the stop-work signs that mean it's time to call a qualified technician.
Table of Contents
- Why Gate Opener Adjustment Is a Safety Procedure First
- Tools, Safety Gear, and Pre-Adjustment Checks
- Setting Travel Limits and Closed-Position Stops
- Tuning Force and Sensitivity the Right Way
- Aligning Photoeyes and Secondary Entrapment Protection
- Symptom to Cause Troubleshooting Guide
- Maintenance Habits, Model Caveats, and When to Call a Pro
Why Gate Opener Adjustment Is a Safety Procedure First
A gate that stops short, reverses unexpectedly, or won't hold at the closed position is already telling you something important. The issue may be in the opener, but it may also be in the gate leaf, hinge line, track, or foundation. That's why how to adjust automatic gate opener settings starts with safety, not convenience.
Limits, force, and sensors are safety thresholds
Limit switches, limit stops, force settings, and sensors don't just control comfort. They control where the gate ends its travel, how hard the operator pushes, and what happens when the system senses resistance. Manuals say to retest force and travel after every change, because improper adjustment can defeat the protections that are supposed to prevent entrapment installation and retest guidance, force and obstruction testing.
That's why the same symptom can point in different directions. A gate that creeps after stopping may be over-energized, but it may also be fighting a sticking hinge or an arm that's out of line. A gate that closes then reopens may be seeing a false obstruction, or it may be set too aggressively for the load it's carrying.
The safest working rule is simple. Adjust one thing, then cycle the gate, then test obstruction reversal again. That's the same logic manufacturer manuals use when they tell technicians to confirm the gate moves freely, set the mechanical endpoints, and only then fine-tune force or sensitivity measurement-based setup, obstruction-sensing setup.
Mechanical symptoms come before electronic diagnosis
If the gate is rubbing, sagging, or binding, the operator is being asked to compensate for a mechanical fault. That's a bad trade. Turning up force to mask drag can hide the underlying problem, create nuisance reversals, and make a compliant gate behave less safely.
The sources reviewed point to the same practical warning. Check power, fuse, sensors, limits, racks or track, hinges, rollers, and binding before blaming the control board troubleshooting guidance. One model may rely on a learn cycle, another on a potentiometer, but the first question is still the same, does the gate move freely by hand?
Residential driveway gates, multifamily gates, and commercial barriers all share that same sequence. Normalize the gate, confirm the safety devices, then make the smallest necessary adjustment. Anything else is guesswork wrapped around a motor.
Tools, Safety Gear, and Pre-Adjustment Checks
A proper adjustment starts before the cover comes off. The work is cleaner, safer, and easier to diagnose when the basics are already verified. For a careful homeowner or property manager, that means a small set of hand tools, the right PPE, and a methodical check of the gate itself before touching the operator.
What to have on hand
A sensible kit includes an insulated screwdriver set, a nut-driver set, 4 mm hex keys, a 2-foot level, a 25-foot tape, a digital multimeter rated to 600 V CAT III, a mechanic's stethoscope or long screwdriver for listening to the drive, a wood block for obstruction testing, and a second person to act as spotter. PPE should include ANSI Z87.1 safety glasses, cut-resistant gloves, closed-toe footwear, and hearing protection for older chain-driven operators.
The point isn't to turn a simple job into a workshop project. It's to avoid improvising around live power, pinch points, and moving hardware. A spotter matters more than most owners expect, especially when the operator behaves differently under load than it does in a dry test.
Practical rule: if the cover is off and the gate can move, treat every test like a live mechanical test, not a casual check.
Checks before any adjustment
First, confirm the correct power supply, proper grounding, and a dedicated circuit. Then lock out the disconnect switch if the unit has one. If the system is already showing intermittent behavior, that's the moment to inspect the supply path and not just the gate.
Next, use the manual release and move the gate by hand. It should swing or slide without binding. Inspect hinges, rollers, track, and post alignment, because the gate itself often creates the fault that shows up as a bad adjustment. Manufacturer guidance commonly says the gate should be plumb and level, and some manuals set very specific geometry targets before mounting the operator, such as the arm alignment and clearance values shown in installation documents measurement-based setup, pre-install gate inspection.
If the operator arm or mounting geometry is wrong, fix that first. If the gate is a swing type and the manual calls for a specific open-wall clearance, verify it now. If it's a slide gate, check the track for drag and vertical play before assuming the motor is weak.
Finally, record a baseline. A simple force comparison at mid-travel in both directions gives a useful before-and-after reference, whether the reading comes from a calibrated gauge or a controlled obstruction test. If the numbers or feel are already uneven before adjustment, that points back to the gate hardware, not the settings.
Setting Travel Limits and Closed-Position Stops
Travel limit adjustment is where a lot of owners get impatient. The gate starts moving again after a few turns, so it feels like the problem is solved. In reality, the operator is only being told where to stop, and the stop itself still needs to be verified with the gate in proper mechanical shape.
Set the stop points before you trust the board
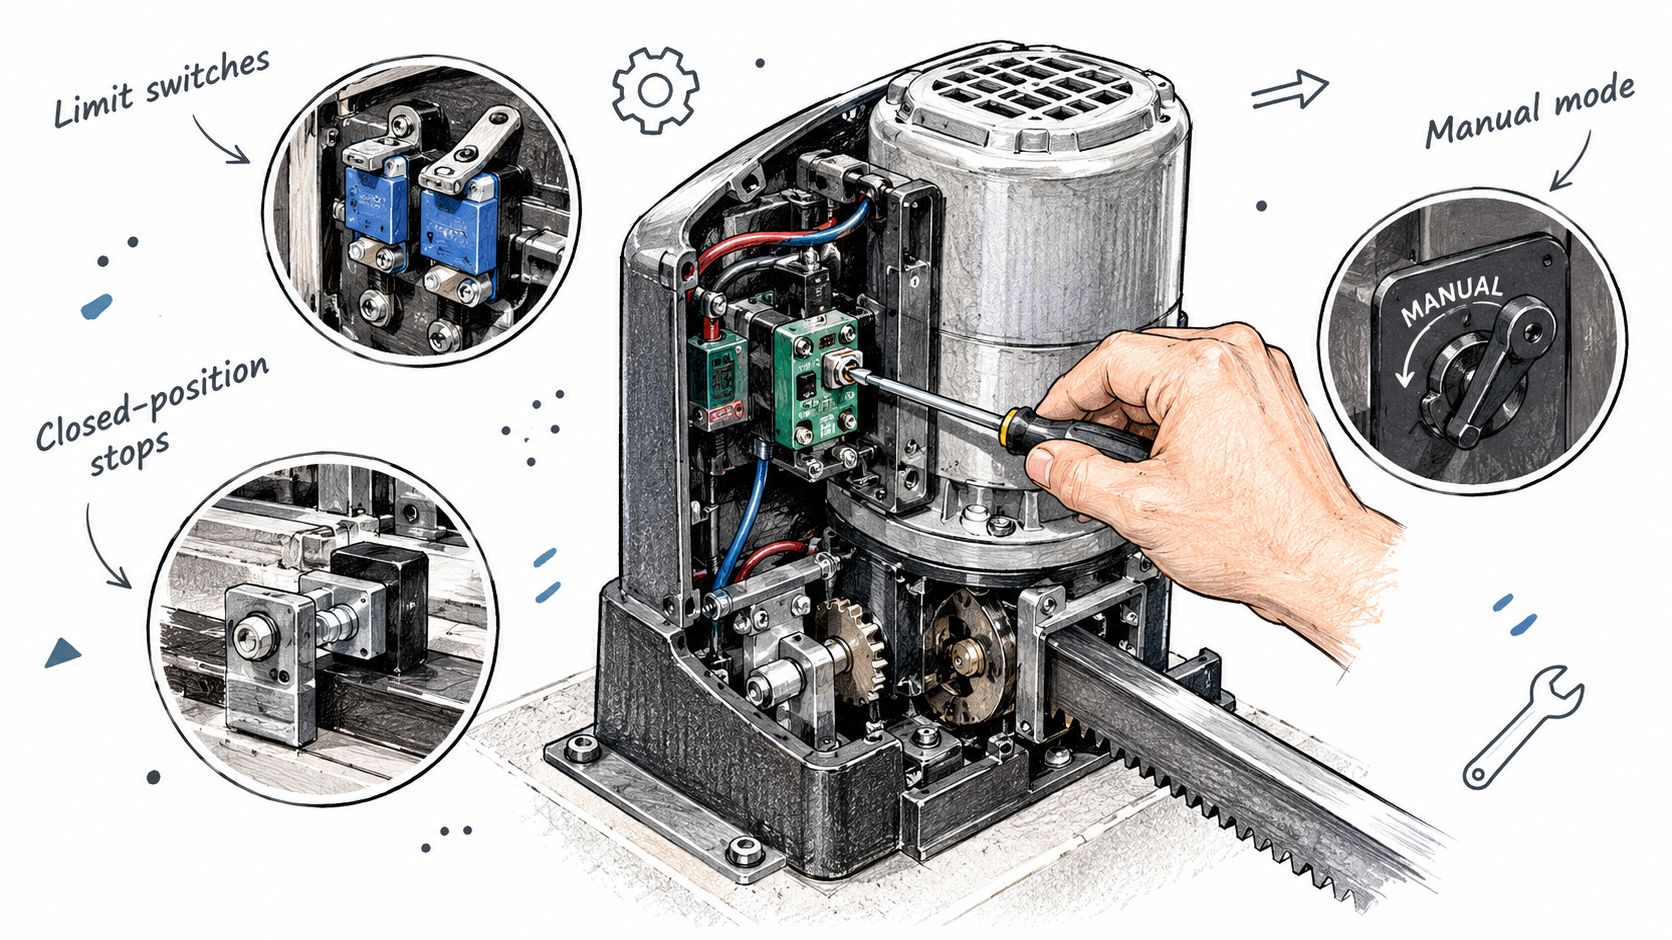
Start with the gate fully closed and confirm that it meets the manufacturer-specified closed-position stop plate. That stop has to be mechanical and solid, not something the motor can push past under a different setting. For ram-arm operators, the rod should be fully retracted or fully extended at the correct endpoint, depending on the configuration, and the internal limit should engage as intended before the electronic logic becomes the only thing preventing over-travel.
For slide gates, limit cams or limit switches usually get set with power off, then rechecked after power is restored. For swing gates, the arm should sit level with the gate in the correct endpoint position, and the brackets should already be tightened before the final test cycle. A few installation manuals also require a concrete cure period before mounting the operator, which is a reminder that the base below the operator matters as much as the drive above it mounting and geometry requirements.
The good practice is to mark the ram shaft or actuator position, establish the endpoint, and then run a complete open and close cycle. If the gate slams, rebounds, or stops shy of the latch, the limit still isn't right. If the gate over-travels, the mechanical stop or open-position clearance needs another look.
Recheck every endpoint, then test obstruction reversal
After any change, the gate needs a full cycle test and an obstruction test in both directions. Manuals are direct about that, and they don't leave room for assuming the first pass was enough retest after each change, obstruction test sequence. A wood block at the leading edge tells you whether the gate reverses correctly at contact, and it should do that consistently after every travel change.
For a swing gate, final open positioning should leave enough clearance from fixed structures that the leaf doesn't clip a wall or post. For a slide gate, the end-of-travel stop should leave the gate square and stable in the pocket or stacked position. If the gate opens and closes but sounds rough near the end of travel, that usually means the stop is still fighting the geometry.
A gate that only works after the operator is “helped” into position is not adjusted correctly. It's only being tolerated.
One useful note for a homeowner or property manager is to document the final positions with a photo and written measurement. That makes later troubleshooting much easier, especially when a change in weather, wear, or a storm shifts the gate out of the old setting. Where a model uses learned limits, a learn cycle may store the endpoint differently than a mechanical cam, so the manual always wins.
For a related example of hardware layout and access components, Nimbio's electronic gate access components are one way a cellular controller can sit alongside an existing operator without changing the gate itself.
Tuning Force and Sensitivity the Right Way
Force tuning is where the job often goes wrong. People hear a gate reverse and assume it needs more power. In reality, the operator may already be doing its job correctly by reacting to drag, misalignment, or obstruction.
Adjust in small steps, then test again
On many boards, force or sensitivity lives under a dial, a potentiometer, or a learned menu. Some operators even set force automatically when travel limits are programmed, then ask for fine-tuning afterward automatic force setup. The safest method is the same either way, make one small change, run one full cycle, and log the result before touching anything else.
Manufacturer guidance says to start at minimum force and increase only until the gate moves smoothly without nuisance tripping, while also warning not to use force to compensate for a sticking or poorly maintained gate obstruction sensitivity guidance. That warning matters. If the gate only works when force is set too high, the operator is being asked to hide a mechanical problem.
A useful obstruction test is simple. Place a flat 2×4 at the midpoint of a swing arc, then use a rigid obstruction at the leading edge where the gate first makes contact, and confirm that the gate reverses in both directions. Manuals also emphasize that the gate should reverse on contact with a rigid object, or stop when a non-contact sensor is triggered, and then be retested after every force or travel adjustment reverse-on-contact guidance.
Check voltage before blaming the setting
If the gate still behaves strangely after a small force change, the next check is electrical load, not a bigger setting. One expert guide recommends verifying that control-board voltage stays within 10% of rated voltage under load before changing settings, because low supply can mimic drag or weak drive torque load-voltage check. That matters when a gate starts behaving differently after long cable runs, weather exposure, or a failing transformer.
If the gate stops or reverses before full travel, a slight clockwise increase may be appropriate on some boards. If it fails to reverse after an obstruction, the force needs to come down. Either way, the adjustment should happen in tiny increments, because too many changes at once can defeat the reversal logic and make troubleshooting harder.
Practical rule: if the operator seems “weak,” prove that the gate isn't dragging before adding force.
The most common mistake is to keep raising the setting until the gate clears the problem once. That may get the gate moving today, but it often leaves the system less safe tomorrow. If the control board, motor leads, or harness are outside spec, the right fix is diagnosis, not a stronger dial setting.
Aligning Photoeyes and Secondary Entrapment Protection
A gate that refuses to close may have a misaligned photoeye, but the same symptom can come from a dragging hinge, shifted stop, or gate that is out of square. Treat sensor work as a safety validation process, not a knob-turning exercise. First confirm that the gate moves freely and reaches its stops without mechanical interference. Only then should you assess the control board or change any setting.
Primary and secondary protection are different jobs
UL 325 and ASTM F2200 separate the operator's inherent entrapment sensing from independent secondary protection. In practice, the operator may monitor motor load internally, while photoelectric sensors or safety edges detect a person, pet, vehicle, or object in the gate path. The installation manual and local requirements determine which devices and configurations apply to a particular operator.
Photoeyes are commonly mounted low enough to detect obstructions near the crossing point. Use the transmitter and receiver indicator lights to align them, rather than estimating the beam by eye. Clean both lenses, confirm that the brackets are tight, and adjust one sensor until the receiver shows a stable signal. Break the beam by hand and confirm that the signal changes immediately. If the lights flicker, inspect the mounting posts, wiring, and connectors before blaming the control board.
If your photoeyes keep showing a false obstruction, fix misaligned gate sensors by checking the indicator lights, cleaning the lenses, and confirming that both units face each other squarely.
Sunlight can interfere with some receivers, particularly when glare reaches the lens at a predictable time of day. A fault that appears only in the morning or afternoon points toward the sightline, shading, or sensor position. Do not raise force or bypass the device to overcome that symptom.
Safety edges and monitored devices need clean wiring
A safety edge belongs on the leading edge or another pinch point where contact is reasonably foreseeable. Monitored edges use a defined resistance or signal pattern, allowing the controller to identify an open, damaged, or disconnected circuit. A fault should be diagnosed and repaired, not defeated with a jumper.
Swing gates crossing pedestrian areas may need more than one protective device because the hinge line, travel path, and entry lane can create separate entrapment zones. The operator manual and applicable local rules control the final arrangement. If a device will not clear after correct alignment, inspect its cable, termination, and mounting, then stop if the controller continues to fault. Call a qualified gate technician rather than bypassing protection.
For sensor-specific checks, this guide to electric gate sensor repairs provides a practical reference when the photoeye is the clear fault and the gate mechanism has already been verified.
Block the beam, confirm that the gate stops or reverses as designed, then clear the beam and verify normal operation. Perform that check after adjustment and during routine maintenance. A sensor that worked last week still requires a current test before the gate is returned to service.
Symptom to Cause Troubleshooting Guide
A symptom list is only useful if it separates the gate from the operator. Many people see the same behavior and jump straight to the control board, but the gate path, hinges, rollers, and track often explain the problem faster. The table below keeps diagnosis in order and shows where to stop.
| Symptom | Likely Cause (Mechanical) | Likely Cause (Electrical) | First Quick Check | Stop and Call a Pro If… |
|---|---|---|---|---|
| Gate stops short | Binding hinge, dragging track, misaligned arm | Low voltage, limit setting drift, board fault | Release it by hand and feel for drag | The board shows a fault code that won't clear |
| Reverses mid-cycle | Leaf rubbing a post or wall, obstruction in path | Sensitivity set too high, sensor misread | Watch for a spot where it hesitates | It happened right after a storm or impact |
| Won't hold open or closed | Weak latch engagement, stop plate shifted | Limit memory drift, control logic issue | Check the end stop and latch by hand | The motor smell is burnt or hot |
| Hums without moving | Jammed gear train, seized hinge, stuck roller | Failed capacitor, board energizing but not driving | Pull the manual release and test movement | There's visible capacitor bulging |
| Opens but won't close | Obstruction in close path, gate out of plumb | Photoeye blocked, sensor misaligned | Clean and inspect the sensor path | The operator is faulting after reset |
| Closes then reopens | Gate hitting resistance at the stop, latch misfit | Force too high or too low, entrapment logic tripping | Watch the endpoint and the closing edge | There's arcing on the board |
| Remote works only at close range | Antenna placement issue, weak receiver, interference | Battery in remote, receiver fault | Try a fresh battery first | There was lightning, surge, or water intrusion |
The point of this table isn't to invite disassembly. It's to show the first cheap check and the line where a technician should take over. If the symptom appeared after weather, a vehicle strike, or a power event, the electrical side moves up the list very quickly.
For a broader comparison of gate fault patterns and sensor-related troubleshooting, a garage door lead capture system is a separate resource that can help a repair shop organize intake, but the gate itself still needs diagnosis at the operator and hardware level.
A good shortcut is to map each row back to the earlier sections. Mechanical drag belongs in the pre-adjustment checks, limits belong in the travel section, force belongs in the tuning section, and sensors belong in the entrapment-protection section. That keeps the fix from skipping straight to the wrong part.
Maintenance Habits, Model Caveats, and When to Call a Pro
Most gate problems start as wear, not as a mysterious board failure. Hinges sag, posts settle, rollers flatten, and track debris builds up. Turning up force first only helps the operator hide those problems until they get worse.
Maintenance keeps the adjustment honest
A practical quarterly routine goes a long way, even though the exact interval is always a property decision. Lubricate hinges and pivot points with silicone, not heavy grease, tighten hinge bolts to spec, clear debris from the track, re-tape or re-mark the closed-position stop, and recheck photoeye alignment after landscaping or ground work. A gate that was aligned last season may no longer be aligned after the soil moves.
The most useful contrarian point is this, if a gate needs more force to behave, it probably needs less force and more repair. That's consistent with the manuals that warn against using force to compensate for sticking hardware force misuse warning. A property manager who treats the operator like a bandage instead of a safety device usually ends up with repeat callbacks.
Model differences matter too. Some LiftMaster and Craftsman boards use POT adjustments, while some Viking and USAutomatic operators store limits in learned cycles. FAAC and Nice models can require a programming sequence before the motor accepts new limits. None of that changes the basic order, but it does change where the settings live.
Know the stop-work signs
Grinding from the gearbox, visible arcing on the board, a motor that runs hot, or any gate that keeps moving after the operator has shut off are all signs to stop. So is a system that started misbehaving after a storm, a lightning event, or a vehicle strike. At that point, the operator may be protecting itself, or it may already be damaged.
If the gate feels worse after each adjustment, the work has crossed from tuning into damage control.
For properties that want better remote access once the hardware is stable, a cellular retrofit controller can be added as a convenience layer. Nimbio is one example of that approach, since it connects over cellular LTE, wires into the gate operator already on the property, and keeps existing clickers, fobs, and keypads working alongside the app. That kind of add-on belongs after the mechanical and safety baseline is solid, not before.
For a practical checklist that helps owners avoid repeat faults, see how to prevent gate failures. A disciplined inspection routine is usually cheaper than chasing the same adjustment problem every season.
If the gate still won't behave after the mechanical checks, limit reset, force test, and sensor verification, Nimbio can be part of the access plan without changing the gate itself. It connects by cellular LTE, keeps existing remotes and keypads in service, and lets property managers issue or revoke digital keys remotely, including visitor access with video verification. Visit Nimbio to see whether a cellular retrofit fits the way the property already works.