Monday morning starts with Carla's clicker blinking red at the resident gate. A delivery truck is waiting behind her, residents are calling the management office, and pressing the button harder changes nothing. The immediate instinct is replacing the garage remote, but a dead clicker can point to a battery, a worn receiver, an aging opener, or an access system that has outgrown handheld controls.
The right fix depends on identifying the failure before buying hardware. For a homeowner, that may mean pairing a compatible remote. For an HOA, multifamily property, or gated community, it may be the first signal that shared clickers and untracked credentials need a broader access-control strategy.
Table of Contents
- When a Dead Remote Is Really an Access Problem
- Pair a New Garage Remote the Right Way
- Why Frequency and Code Family Decide Compatibility
- Troubleshooting a Remote That Will Not Program
- Lost or Stolen Remote and the Case for Erasing Everything
- Beyond the Clicker to Smartphone-Controlled Access
- When to Replace the Remote and When to Replace the System
When a Dead Remote Is Really an Access Problem
Carla starts with the simplest checks. She installs a fresh battery, tests the wall button, holds the remote close to the motor housing, and asks whether the keypad still opens the gate or garage. This quick triage separates a failed handheld transmitter from a problem inside the opener or shared receiver.
If the wall button and keypad work while the remote remains silent, the opener is probably receiving commands correctly. The replacement plan can stay narrow. If the wall button, keypad, and every remote fail, the fault may be upstream in the opener, transformer, wiring, or common receiver.
Practical rule: Test another access method before ordering a remote. A replacement clicker can't repair a failed receiver or a dead operator.
A jammed door also needs a mechanical inspection before any electronics are replaced. A resource on garage door repair for a jammed door can help separate an access failure from a door that can't move safely because of its tracks, springs, or other hardware. Property teams that need a broader diagnostic path can also troubleshoot garage door opener issues before treating the remote as the culprit.
Identify the opener before buying anything
The opener model is the prerequisite for successful replacement. Brand alone isn't enough because Chamberlain, LiftMaster, Genie, Overhead Door, Marantec, and Linear have shipped multiple generations with different frequencies and security formats.
A technician or property manager should record:
- Brand logo: Check the motor housing and wall console.
- Model number: Look near the lens, antenna, or identification label.
- Manufacture date: Older systems may use a different receiver technology than later models.
- Learn-button color: Yellow, purple, red, green, and orange buttons identify different opener families.
- Original remote details: The FCC ID inside the battery compartment can help identify the exact transmitter family.
- Fallback clues: Owner manuals, rail branding, drive-belt style, and wall-console design can confirm the model when labels are damaged.
Most garage door openers manufactured between 1993 and 2005 used 390 MHz remotes, while many manufacturers moved toward 315 MHz around 2005, according to Chamberlain's frequency guidance. A buyer who skips identification can easily purchase a universal clicker that looks compatible but refuses to enroll.
Learn-button color and matching frequency
The table below is a screening aid, not a substitute for the opener manual. Learn-button color varies by manufacturer and model family, so the exact model and original remote still control the final decision.
| Learn Button Color | Frequency | Code Technology | Common Brands |
|---|---|---|---|
| Yellow | 310 MHz | Rolling code, often Security+ 2.0 family | Chamberlain, LiftMaster |
| Purple | 315 MHz | Rolling code | Chamberlain, LiftMaster |
| Red or orange | 390 MHz | Rolling code or manufacturer-specific format | Chamberlain, LiftMaster, compatible legacy families |
| Green | 390 MHz | Rolling code or older compatible code family | Chamberlain, LiftMaster |
| No learn button, DIP switches | Varies by legacy system | Fixed code | Older Genie, LiftMaster, Overhead Door, and other legacy openers |
The historical shift explains why a remote can work perfectly at one property and fail at another. The first electric garage door opener became commercially available in 1926, wireless systems were developed independently in 1931, and mass-produced radio-controlled openers appeared by 1954. By the 1970s, digitally coded systems were being introduced, and wireless remotes were widespread by the mid-1980s, when simple transmitters could sometimes open a neighbor's door. That weakness helped drive rolling-code adoption, as documented in the history of garage door remotes.
For an HOA, the remote is only one node in a larger access stack. The operator, receiver, keypad, wall station, vehicle controls, credentials, and emergency procedures all matter. Replacing one clicker may solve Carla's Monday problem, but it won't answer who still has access, how quickly a lost remote can be revoked, or whether the community is relying on a security format that no longer fits its risk.
Pair a New Garage Remote the Right Way
Modern openers usually pair a replacement through the receiver's Learn or Program button. Clear the area around the door, power the opener, and keep the new remote ready before activating enrollment mode.
Press and release the Learn button until its LED begins blinking. The receiver's pairing window is short, usually about 30 seconds, so the new remote button must be pressed promptly. A successful enrollment may produce a flashing opener light, a motor click, or another model-specific confirmation.
The exact button behavior varies:
- Chamberlain and LiftMaster: A single long press commonly assigns the remote.
- Genie and Overhead Door: Some models use a triple-press sequence for the first remote position.
- Marantec: The remote may need to be held within a few inches of the motor head during enrollment.
The manual remains authoritative because manufacturers change the sequence across code families. Guidance on how to program a universal remote can help with general workflows, but the opener's own manual should decide the final sequence.
Older systems may not have a Learn button at all. They often use DIP switches, which means the tiny switches inside the old and replacement remotes must match in identical positions. If the original clicker is missing, the configuration may be available inside the wall console or receiver.
Some universal remotes support both Learn-button enrollment and DIP-switch fallback. That can help mixed-fleet properties, but the remote still needs the correct frequency and code family.
After pairing, test from close range, then from about 20 feet away and from the curb. A remote that works only beside the motor may be hiding an antenna, interference, or receiver problem. Property managers working with LiftMaster equipment can also fix LiftMaster garage door pairing issues when the standard enrollment sequence doesn't produce a reliable result.
Why Frequency and Code Family Decide Compatibility
Two invisible layers determine whether a replacement remote can communicate with an opener: radio frequency and code family. North American systems commonly use 315 MHz or 390 MHz, while some equipment supports dual-frequency or auto-seek operation, as described in this overview of garage door remote frequencies.
The code family creates the harder boundary. A fixed-code remote sends the same configured signal, often set with DIP switches. A rolling-code remote changes its code sequence, using synchronized logic intended to reduce code-grabbing and replay attacks. A fixed-code duplicator can't enroll as a rolling-code transmitter simply because both devices operate on a similar radio band.
Rolling-code security also deserves a realistic assessment. A 2022 case study found implementation weaknesses in two of three investigated brands, and a 2024 academic study reported that an adversary could open the door after sniffing one open/close signal in some rolling-code systems, according to the University of Victoria research record. The lesson for property managers is clear: protocol implementation and firmware behavior matter, not just the remote's appearance.
| Brand | Typical Frequency | Code Family | Universal Remote Compatible? |
|---|---|---|---|
| LiftMaster | 315, 390, or 310 MHz depending on model | Fixed code or rolling code | Only when the remote supports the exact family |
| Chamberlain | 315, 390, or 310 MHz depending on model | Security+, Security+ 2.0, or legacy formats | Model-specific |
| Genie | Varies by generation | Intellicode or legacy fixed code | Some compatible models only |
| Overhead Door | Varies by generation | Code-specific rolling or legacy formats | Model-specific |
| Marantec | Varies by model | Manufacturer-specific rolling formats | Check exact receiver support |
The buyer's rule should be frequency first, code family second, brand third. “Universal” describes a feature set, not a guarantee. Owners using vehicle-integrated controls should verify the same details when they troubleshoot HomeLink with LiftMaster.
Troubleshooting a Remote That Will Not Program
A replacement remote that won't sync needs a layered diagnosis, not repeated button pressing. The fastest path starts with power and ends with protocol compatibility.
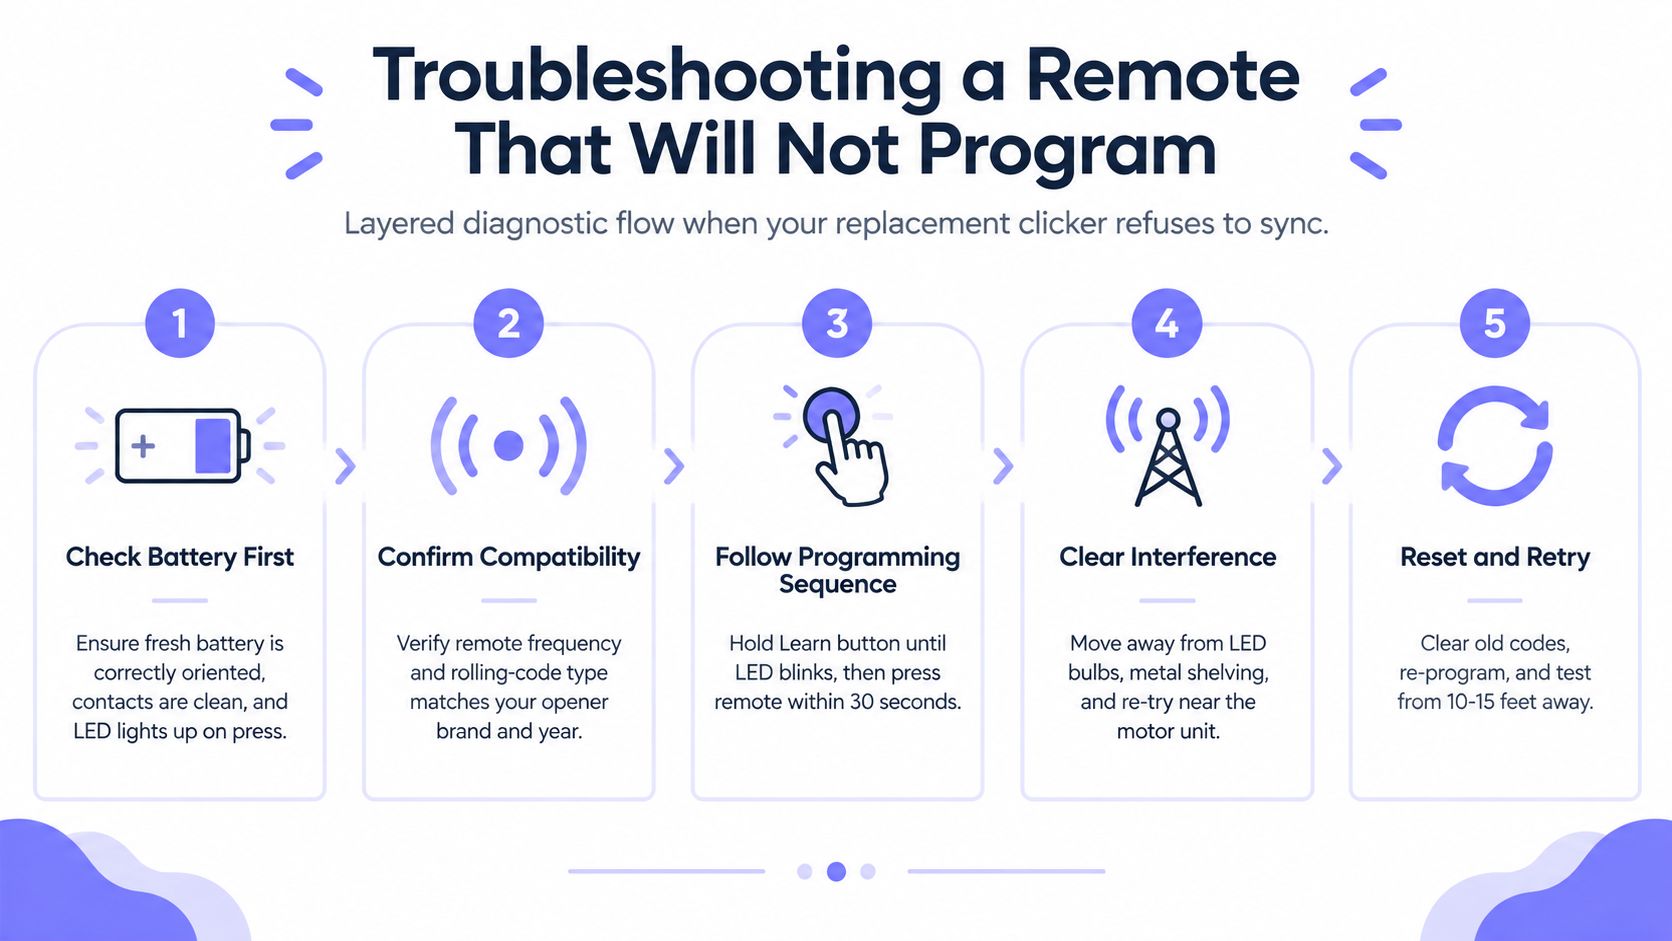
Check the battery first. Confirm that it's fresh, installed in the correct orientation, and making clean contact. Corrosion can produce an LED response without enough dependable output for enrollment.
Then test close to the motor head, within about three feet, and move away from possible interference from LED bulbs, smart hubs, metal shelving, or nearby gates. If the remote works beside the opener but not at normal range, signal conditions or the antenna deserve attention.
Read the receiver's behavior
Press the Learn button and watch the LED. Most units provide only about 30 seconds after the LED illuminates, so the remote button must be activated during that window.
Use the symptoms to narrow the fault:
- Rapid blinking without door movement: The transmitter and receiver failed to complete the handshake.
- No Learn LED response: The opener may not be entering enrollment mode, or the receiver may have a power or hardware fault.
- Remote LED works but the receiver never reacts: Frequency or code-family incompatibility is likely.
- Pairing succeeds, but range is poor: Inspect the antenna, interference sources, and receiver location.
LiftMaster models with a yellow Learn button may require a second press in their programming sequence. Chamberlain behavior also differs by model, so a replacement remote shouldn't be assumed to preserve or erase existing remotes without checking the manual.
If troubleshooting has reached the receiver rather than the clicker, stop buying remotes. A failing logic board, damaged antenna, or unstable power supply will keep producing the same symptoms with every replacement.
Lost or Stolen Remote and the Case for Erasing Everything
Pairing a replacement after a remote disappears is only half a fix. The responsible response is to remove the missing transmitter from the opener's memory, then enroll authorized devices again.
A lost clicker can remain a credential until the receiver's stored codes are erased. Powering the opener off doesn't solve that access problem because authorized codes persist in receiver memory.
Hold the opener's Learn button until the LED indicates that stored credentials have been cleared. The exact timing and feedback vary by model, so the owner manual should control the procedure rather than a universal timing assumption.
A full reset may remove:
- Paired remotes
- Keypad codes
- Vehicle integrations such as HomeLink
- Other enrolled access credentials
After the wipe, the replacement remote should be paired first, followed by every authorized resident, staff member, or household user. A property manager should coordinate re-registration rather than allowing residents to restore access independently over several days.
This matters even more at HOA gates and multifamily properties. One missing clicker among many residents can create an access gap that a simple pair-and-go workflow doesn't address. The reset plan should include a current credential list, a communication notice, a re-enrollment window, and confirmation that old devices no longer operate the gate.
Beyond the Clicker to Smartphone-Controlled Access
A newly paired clicker can solve an immediate access problem, but it also exposes the limits of handheld credentials. A remote is difficult to audit, easy to lend, and inconvenient to revoke when a resident moves out or a contractor finishes work.
Wi-Fi retrofit controllers such as LiftMaster myQ, Genie Aladdin Connect, and Nexx Garage can mount near an existing opener and translate app commands into door operations. They can add smartphone control without replacing the motor, but the operator housing must have dependable network coverage.
HOA gates often sit far from a building's internet equipment. That makes a cellular controller more practical than a Wi-Fi bridge in locations where signal drops, network changes, or unreliable coverage can strand residents and service providers.
A property team comparing retrofit paths should examine:
- Connectivity: Wi-Fi depends on the local network, while cellular equipment communicates through the mobile network and avoids Wi-Fi drops at the operator.
- Hardware scope: Hardware-agnostic retrofit technology can connect to existing gates without requiring a complete gate-operator replacement.
- Credential management: Smartphone systems can support remote visitor management and digital credentials instead of relying on shared clickers.
- Legacy access: Many retrofit kits leave the original RF receiver active, so old remotes may continue working unless administrators deliberately retire them.
- Operating model: Cloud-based access control introduces subscription and service-dependency questions that should be reviewed before installation.
Nimbio provides a cellular retrofit option for electronic gates and building access, with smartphone-based credentials, remote access administration, and visitor management while preserving compatible existing hardware. For gated communities, cellular connectivity is the important distinction: the system doesn't require Wi-Fi at the gate operator, and administrators can manage access without distributing another physical clicker.
The clicker is a bridge, not a destination. Once a property has repeated lost remotes, resident turnover, or uncertain credential ownership, smartphone-controlled access deserves consideration as an access-management decision rather than a convenience accessory.
When to Replace the Remote and When to Replace the System
Not every failed clicker justifies a new opener. A remote replacement is sensible when the opener works from the wall button, another paired remote functions normally, or the original device is lost, cracked, or worn.
The operator itself deserves attention when the motor hums without moving the door, the wall button behaves inconsistently, or the door reverses unpredictably. Grinding, jerky movement, belt slack, visible belt damage, or a motor that struggles to lift the door point toward mechanical or operator trouble rather than a transmitter fault, as described in this guide to garage door opener belt replacement.
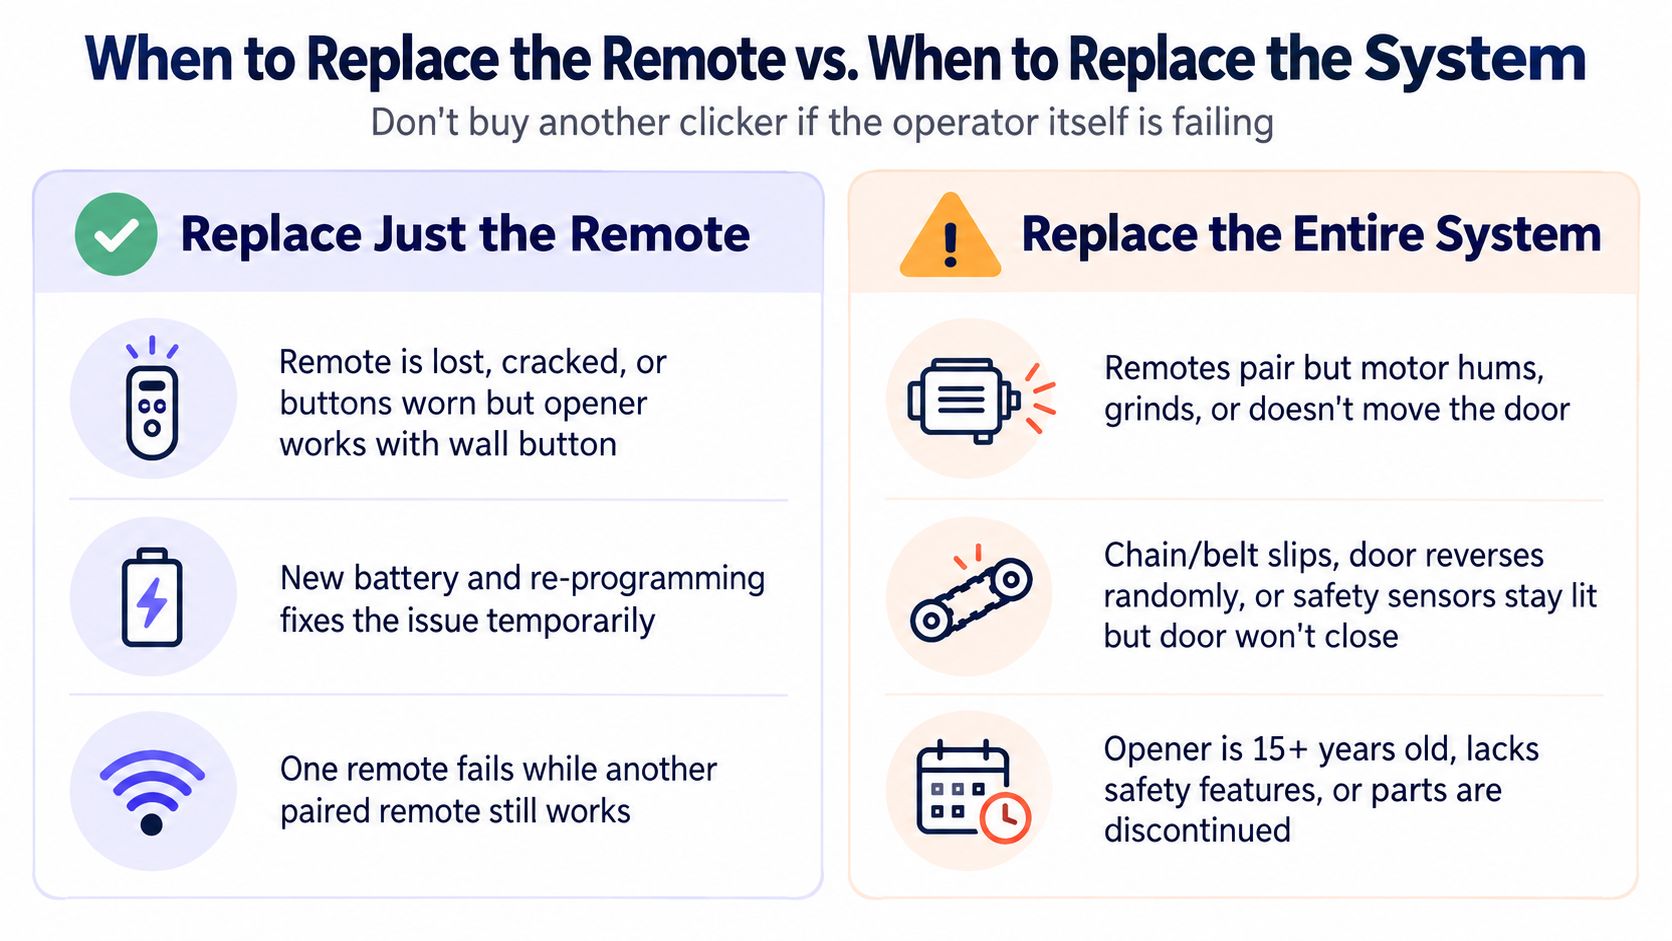
Replace just the remote when
- The opener responds normally: The wall control operates the door and safety functions behave correctly.
- One transmitter fails: Another paired remote still works from normal range.
- The credential changed: A new resident, tenant, or household member needs authorized access.
- The device is physically worn: Buttons, casing, or battery contacts have failed while the opener remains healthy.
Replace the system when
- The motor struggles: It hums, grinds, or fails to move the door after a valid command.
- The drive mechanism slips: The chain or belt produces jerky movement, unusual noise, or visible wear.
- Safety behavior is unreliable: The door reverses randomly or won't close despite correct sensor alignment.
- Parts and security have aged out: The opener lacks expected safety features or replacement parts are difficult to obtain.
- The property has credential churn: Managers keep replacing clickers because no central system can grant, revoke, schedule, or audit access.
For an opener manufactured between 1993 and 2005, the replacement decision should also account for the common 390 MHz legacy context and the distinction between older fixed-code systems and later rolling-code designs. For openers made after that period, exact model compatibility remains more important than brand familiarity.
The candid verdict is simple. Replace the remote when the opener is relatively new and behaves normally. Replace or modernize the system when remote replacement has become a bandage over a failing operator or an unmanaged access program.
Nimbio gives property managers and HOA boards a cellular way to retrofit electronic gates and building entry without replacing compatible gate hardware or depending on Wi-Fi at the operator. Visit Nimbio to evaluate smartphone credentials, remote visitor access, and centralized control as the next step beyond replacing garage remotes.